Every cyclist eventually finds himself in need of a chain repair tool, whether riding a dirt bike or a mountain bike. There is a chain removal tool, but it’s also important to know how to use a chain breaker.
A bike chain breaker tool is used both for unlinking and relinking chains and is necessary for length adjustment. This device works by pushing a pin or rivet into or out of the link.
Let’s take a look at how to break a bike chain or link it with another in the detailed steps below.
Use the bike chain opener to break the chain
Step 1: Put the chain on the tool
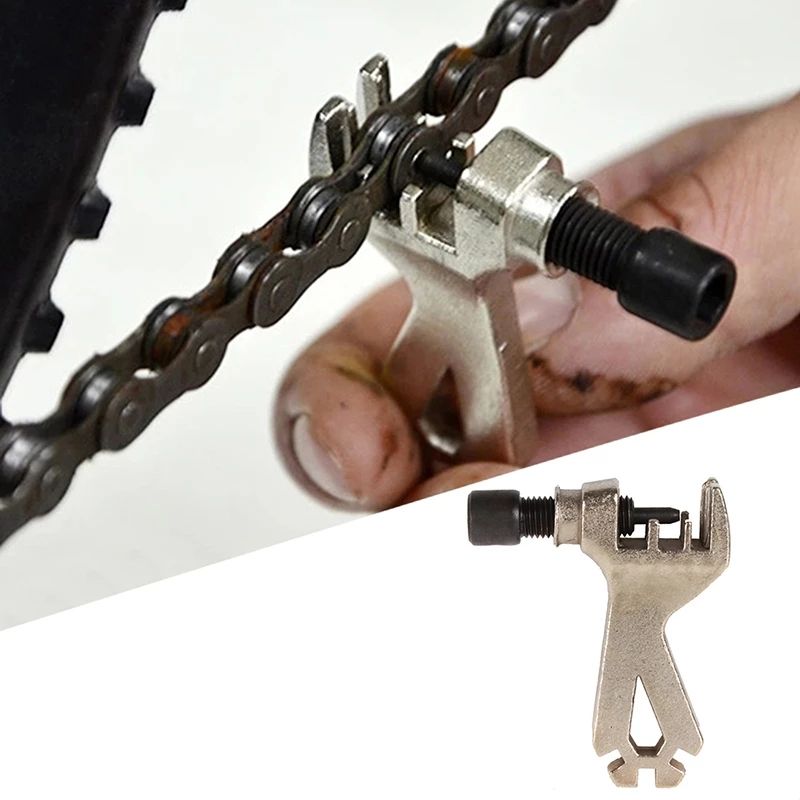
The tool has a knob for adjusting the tool pin and a slot for the chain. There are two parts on this socket, the inner and the outer, although we’ll only be using the latter to break the chain.
Place the link you want to break on the breaker tool and use the outer slot; this is the one farther away from the knob or handle. Turn the knob to adjust the tool’s pin until it reaches the linkage.
Step 2: Slowly push the chain pin out
By turning the knob further, the pin of the bicycle chain breaker will push the pin or rivet out, causing the connection to loosen. Begin turning the knob a half turn, being careful not to push the rivet out too quickly.
At some point during the adjustment process, you will feel increased resistance as you turn the tool knob. It is at this point that the chain pins are about to be fully rolled out.
Step 3: Remove the link
If that’s what you want, turn the knob all the way to push the pin out, but if you plan to use this particular part to reattach the chain later, it’s best not to.
To avoid removing the rivet completely, limit yourself to a half turn after you feel the tool’s resistance increase; this should be enough to remove the link.
You may have to manually twist the link a bit to remove it all the way, but you’ll find that only a small portion of the pin is hinged in the slot and it should come off easily with some hand pressure.
link chain
Step 1: Place the chain to be linked on the tool
To reattach the chain, connect both sides first. You will again need to screw the ends together to make them fit, but they should snap into place with no trouble.
Readjust the pin of the tool to clear it from the groove and put the chain in the outer groove again. The chain pin should stick out of the side of the link and face the tool pin. Adjust the tool pin until it touches the chain pin.
Step 2: Adjust the knob until the chain pin is in place
Turn the knob to push the chain pin into the link and pass it through the other side. The goal is to have some of the pins protruding out of the sides of the chain.
Remove the chain from the groove and check that the link sections are loose enough to allow movement. If it’s too stiff or too tight, you’ll need to adjust the chain pin, which is what the tool’s internal slots are for.
Place the chain on the inner groove and turn it slightly to adjust. Check for tightness after each turn. Once the link is loose enough to move, the adjustment is complete.
Post time: Jun-05-2023